Create a transfer request
This section describes how a merchant can integrate Solana Pay transfer requests into their payments flow. It shows how to create a payment request link, encode it into a QR code, find the transaction, and validate it.
This guide walks through an example of a QR code-based Point of Sale system that accepts payments via Solana Pay.
The complete example code can be found here.
Requirements
Before you can receive payments, you'll need to obtain a native SOL address. This doesn't cost anything, and you can use any wallet to get started.
If you want to receive USDC or another SPL token on Solana, you'll need to create a token account, which may require a small amount of SOL.
One way to do both is to use FTX / FTX.us, which will provide a native SOL deposit address and an associated USDC token account to receive payments.
1. Set up Solana Pay
Install the packages and import them in your code.
npm
npm install @solana/pay @solana/web3.js bignumber.js --save
yarn
yarn add @solana/pay @solana/web3.js bignumber.js
1.1 Import necessary modules
Import the modules used to work with Solana Pay.
import { Cluster, clusterApiUrl, Connection, PublicKey } from '@solana/web3.js';
import { encodeURL, createQR } from '@solana/pay';
import BigNumber from 'bignumber.js';
1.2 Establish a connection
When working on Solana, you will need to connect to the network. For our example, we will connect to devnet.
Establish a connection to the devnet network
async function main() {
    // Variable to keep state of the payment status
    let paymentStatus: string;

    // Connecting to devnet for this example
    console.log('1. ✅ Establish connection to the network');
    const connection = new Connection(clusterApiUrl('devnet'), 'confirmed');
}
2. Create a payment request link
Solana Pay uses a standard URL scheme across wallets for native SOL and SPL Token payments. Several parameters are encoded within the link representing an intent to collect payment from a customer.
Create a payment request link with a recipient, amount, label, message , memo and reference.
// -- snippet -- //

/**
 * Simulate a checkout experience
 *
 * Recommendation:
 * `amount` and `reference` should be created in a trusted environment (server).
 * The `reference` should be unique to a single customer session,
 * and will be used to find and validate the payment in the future.
 *
 */
console.log('2. 🛍 Simulate a customer checkout \n');
const recipient = new PublicKey('MERCHANT_WALLET');
const amount = new BigNumber(20);
const reference = new Keypair().publicKey;
const label = 'Jungle Cats store';
const message = 'Jungle Cats store - your order - #001234';
const memo = 'JC#4098';

/**
 * Create a payment request link
 *
 * Solana Pay uses a standard URL scheme across wallets for native SOL and SPL Token payments.
 * Several parameters are encoded within the link representing an intent to collect payment from a customer.
 */
console.log('3. 💰 Create a payment request link \n');
const url = encodeURL({ recipient, amount, reference, label, message, memo });
Optional. SPL token transfer
For SPL Token transfers, use the spl-token parameter. The spl-token is the mint address of the SPL token.
See code snippet
/**
 * Simulate a checkout experience with an SPL token
 */
console.log('2. 🛍 Simulate a customer checkout \n');
const splToken = new PublicKey('EPjFWdd5AufqSSqeM2qN1xzybapC8G4wEGGkZwyTDt1v');

/**
 * Create a payment request link
 *
 * Solana Pay uses a standard URL scheme across wallets for native SOL and SPL Token payments.
 * Several parameters are encoded within the link representing an intent to collect payment from a customer.
 */
console.log('3. 💰 Create a payment request link \n');
const url = encodeURL({
    recipient,
    amount,
    splToken,
    reference,
    label,
    message,
    memo,
});
3. Encode link into a QR code
Now that you've created a payment link, you need a way to show it to your customers.
Encode the link into a QR code.
// -- snippet -- //

/**
 * Create a payment request link
 *
 * Solana Pay uses a standard URL scheme across wallets for native SOL and SPL Token payments.
 * Several parameters are encoded within the link representing an intent to collect payment from a customer.
 */
console.log('3. 💰 Create a payment request link \n');
const url = encodeURL({ recipient, amount, reference, label, message, memo });

// encode URL in QR code
const qrCode = createQR(url);

3.1 Add the QR code to your payment page
The QR code needs to be visible on your payment page.
Add the QR code to an element on the payment page
// -- snippet -- //

console.log('3. 💰 Create a payment request link \n');
const url = encodeURL({ recipient, amount, reference, label, message, memo });

// encode URL in QR code
const qrCode = createQR(url);

// get a handle of the element
const element = document.getElementById('qr-code');

// append QR code to the element
qrCode.append(element);
Instructions on integrating with your framework of choice can be found here.
4. Show a payment status page
With the payment link set up and shown to the customer, you will need to ensure that the customer has paid for the item before shipping their order.
When a customer approves the payment request in their wallet, this transaction exists on-chain. You can use any references encoded into the payment link to find the exact transaction on-chain.
Use findReference to find the on-chain transaction. Provide a reference to this function that identifies the transaction associated with the order.
// -- snippet -- //

/**
 * Simulate wallet interaction
 *
 * This is only for example purposes. This interaction will be handled by a wallet provider
 */
console.log('4. 🔐 Simulate wallet interaction \n');
simulateWalletInteraction(connection, url);

// Update payment status
paymentStatus = 'pending';

/**
 * Wait for payment to be confirmed
 *
 * When a customer approves the payment request in their wallet, this transaction exists on-chain.
 * You can use any references encoded into the payment link to find the exact transaction on-chain.
 * Important to note that we can only find the transaction when it's **confirmed**
 */
console.log('\n5. Find the transaction');
const signatureInfo = await findReference(connection, reference, { finality: 'confirmed' });

// Update payment status
paymentStatus = 'confirmed';
Note: The findReference function uses confirmed as the default finality value. This can, on rare occasions, result in a transaction that is not fully complete. For full finality, use finalized. This can result in slower transaction completion.
4.1 Retries
If a transaction with the given reference can't be found, the findReference function will throw an error. There are a few reasons why this could be:
- Transaction is not yet confirmed
- Customer is yet to approve/complete the transaction
You can implement a polling strategy to query for the transaction periodically.
// -- snippet -- //

let signatureInfo: ConfirmedSignatureInfo;

return new Promise((resolve, reject) => {
    /**
     * Retry until we find the transaction
     *
     * If a transaction with the given reference can't be found, the `findReference`
     * function will throw an error. There are a few reasons why this could be a false negative:
     *
     * - Transaction is not yet confirmed
     * - Customer is yet to approve/complete the transaction
     *
     * You can implement a polling strategy to query for the transaction periodically.
     */
    const interval = setInterval(async () => {
        console.log('Checking for transaction...', count);
        try {
            signatureInfo = await findReference(connection, reference, { finality: 'confirmed' });
            console.log('\n 🖌  Signature found: ', signatureInfo.signature);
            clearInterval(interval);
            resolve(signatureInfo);
        } catch (error: any) {
            if (!(error instanceof FindReferenceError)) {
                console.error(error);
                clearInterval(interval);
                reject(error);
            }
        }
    }, 250);
});
4.2 Validating the transaction
Once the findReference function returns a signature, it confirms that a transaction that references the order has been recorded on-chain. But it doesn't guarantee that a valid transfer with the expected amount and recipient happened.
validateTransfer allows you to validate that the transaction signature found matches the transaction that you expected.
// -- snippet -- //

/**
 * Validate transaction
 *
 * Once the `findReference` function returns a signature,
 * it confirms that a transaction with reference to this order has been recorded on-chain.
 *
 * `validateTransfer` allows you to validate that the transaction signature
 * found matches the transaction that you expected.
 */
console.log('\n6. 🔗 Validate transaction \n');

try {
    await validateTransfer(connection, signature, { recipient: MERCHANT_WALLET, amount });

    // Update payment status
    paymentStatus = 'validated';
    console.log('✅ Payment validated');
    console.log('📦 Ship order to customer');
} catch (error) {
    console.error('❌ Payment failed', error);
}
Best practices
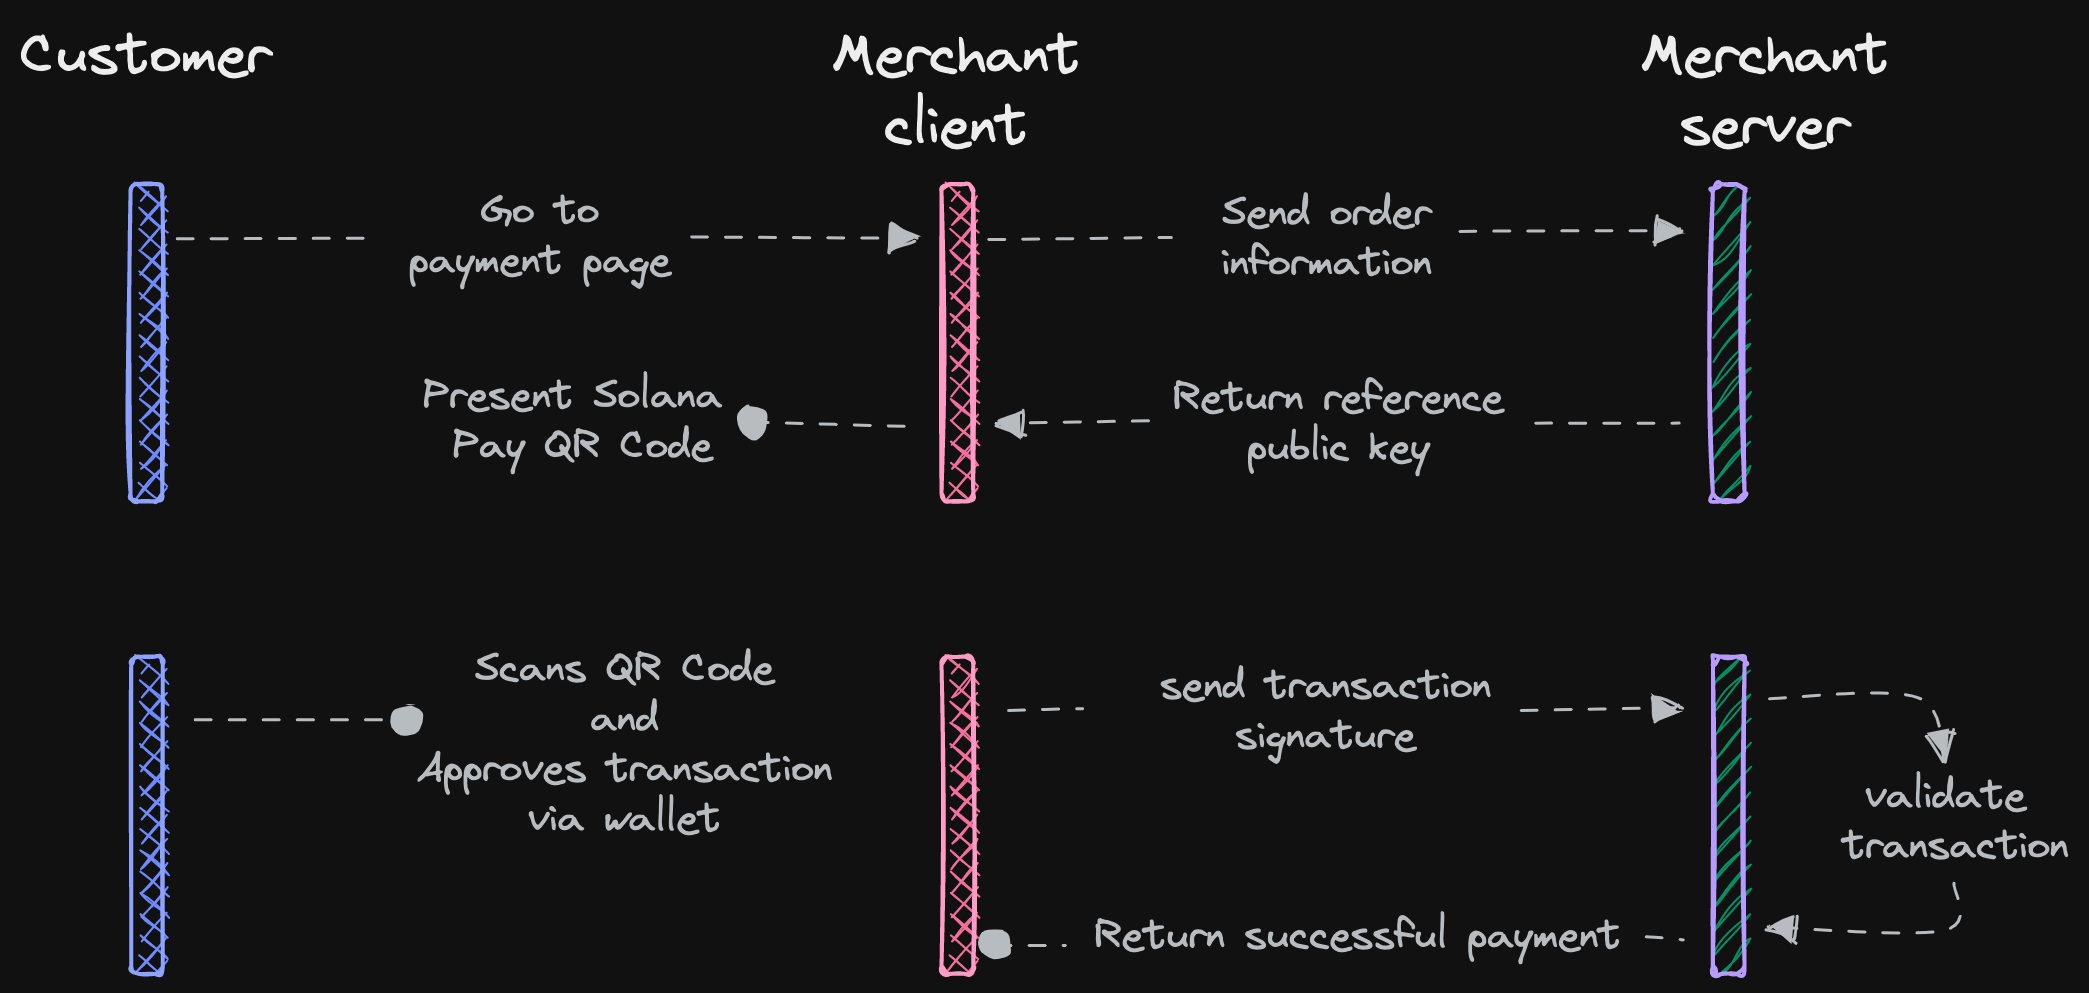
We recommend handling a customer session in a secure environment. Building a secure integration with Solana Pay requires a payment flow as follows:

- Customer goes to the payment page
- Merchant frontend (client) sends order information to the backend
- Merchant backend (server) generates a reference public key and stores it in a database with the expected amount for the shopping cart / pending purchase (unique to each customer's checkout session).
- Merchant backend redirects the user to the confirmation page with the generated reference public key.
- The confirmation page redirects to the merchant with the transaction signature.
- Merchant backend checks that the transaction is valid for the checkout session by validating the transaction with the reference and amount stored in step 3.
The steps outlined above prevents:
- A different transaction from being used to trick the merchant
- The frontend from being manipulated to show a confirmed transaction